How to Clear Memory on Kindle Fire 5th Generation Tablet
Every tablet Amazon Fire tablet released in the past few years has featured a microSD card slot, which is a nice thing to have if you're using a tablet that may have as little as 8GB of built-in storage. You can pick up just about any Class 10 or UHS microSD card to add up to 1TB of expandable storage, depending on which tablet model you're using.
Once you've selected an appropriate SD card, Amazon gives you a lot of control over how to use it with a Fire tablet.
You can decide whether you want to apps to be installed on the SD card, whether movies, music, or other content should automatically be downloaded to the SD card, or whether photos should be stored to the card. You can move apps that are already installed to the SD card, or move them back to internal storage. Or you can just treat the card as removable storage and load it up with music, movies, documents, or other files.

This article has been updated to include instructions for using SD cards with the Amazon Fire HD 8 2020 tablet running Fire OS 7.3.
If you're looking for instructions that work with older Amazon Fire tablets, our guide to using SD cards with the Fire HD 8 (2017) running Fire OS 5.4 may be helpful.
For now, let's take a look at the way removable storage works with Amazon's most recent tablets.
Using SD cards with an Amazon Fire tablet running Fire OS 7.3
Everything described in this section has been tested on an Amazon Fire HD 8 (2020) tablet running Fire OS 7.3. This section was originally published on July 11, 2020.
Setting up SD cards with Fire OS 7.3
Open the door covering the microSD card reader and insert a card.

If this is your first time using this SD card with your tablet, you may see a notification that says "Unsupported Storage." If you do, you can tap that notification to open a menu that offers two options:
- Use for extra tablet storage
- Use for portable storage
The first option allows you to install apps to the microSD card, freeing up space in your Fire tablet's built-in storage. You can also use the SD card to store media and other files, but if you remove the card you'll lose access to any apps installed to it. So only choose this option if you don't plan to remove or swap storage cards frequently.

If you choose the second option, you can use the SD card to store music, movies, and other files, but not apps. This is the better option if you plan to use an SD card to transfer files, movies, or other content between devices.
Once you've made your choice, tap the option and Fire OS will ask if you want to format this storage device.

Note that any data that's already on your SD card will be erased, so make sure to back up any important files and then go ahead and format your storage device.

Using SD cards for portable storage (Fire OS 7.3)
Everything described in this section has been tested on an Amazon Fire HD 8 (2020) tablet running Fire OS 7.3. This section was originally published on July 11, 2020.
If you chose the portable storage option above, you can safely use an SD card to transfer files to and from the tablet using any file explorer app. But you can also automatically download Amazon content to the tablet.
To select which content is saved to the SD card, open your tablet's Settings app and then select the option marked Storage.

Near the top of the screen you'll see a section marked "Internal Storage" that shows you how much free space you have. Tapping it will take you to a screen that shows which apps and files are using up the most space.

Below Internal Storage is a section marked "SD Card Storage", which works the same way… except there are a series of toggle switches below the storage info that let you choose which items, if any, should be downloaded to the card.
Here are your options:
- Download Movies and TV Shows to your SD Card
- Download Music to Your SD Card
- Store Photos and Personal Videos on your SD Card
- Download Audiobooks to Your SD card
- Download Books and Periodicals to your SD Card
These will all be enabled by default, so make sure to uncheck any options you don't want to use. Keep in mind that any content downloaded to an SD card will not be available on your tablet if you remove that card. But you can always re-download that content or access it again by re-inserting the SD card.
Below these options, there are three more:
- Format as Internal Storage
- Erase SD Card
- Safely Remove SD Card
If you choose to Format as Internal Storage, Fire OS will reformat the card (erasing any data currently stored on it in the process), and afterward you'll be able to install apps to the SD card, as described below.

While you can return to the settings menu any time you want to make changes, you'll also see a persistent notification when a microSD card is in use. Pull down the notification tray and tap that message and you'll find options to safely eject the card, or to revisit the setup utility that lets you decide whether to use the card as portable storage or ad an extension of the tablets internal storage.

You can dismiss this notification, but it will reappear any time you remove and re-insert your SD card.
Using SD Cards as internal storage (Fire OS 7.3)
Once your SD card has been formatted for use as internal storage, you'll be greeted by a screen asking if you would like to "Move content to storage device."

This will free up internal storage space by transferring data such as eBooks, photos, videos, documents, and other files to the SD card. But this step will not transfer any installed apps to your SD card. You'll have to do that manually, as described below.
During the file transfer process, which can take some time, certain apps may not work. Amazon also advises against removing the SD card and suggests keeping your tablet charged.

If you'd prefer to move your content later, or have more control over which content is moved, you can tap the "Move Content Later" option rather than the button marked "Move Content."
Whether you move your content or not, you can now open the Settings app and go to the Storage option described in the section above. But this time you'll see a different set of options.

Rather than toggles to choose which content is downloaded and stored on an SD card automatically, you have the following options:
- Move content to Internal Storage (This undoes the "Move content to storage device" option described above. If you haven't taken this step, you'll see a "Move data to SD card" option here instead).
- Move Apps to SD Card
- Format as Portable Storage
If you choose to Move Apps to SD card, Fire OS will automatically detect apps that can be moved and transfer them to your card. This should free up some internal storage space, but perhaps not as much as you would expect since some of your apps probably aren't designed to run from external storage and therefore will not be moved.
In the screenshot above you'll notice that 8 apps on my tablet are available to be moved. But that's just a fraction of all the apps on my tablet.
Also keep in mind that depending on the speed of your SD card, some apps may run more slowly if they're installed to external storage than they would when running from internal storage.

One thing to keep in mind before transferring your apps is that while moving them to external storage is a 1-click process, transferring them back to internal storage is not.
After transferring your apps, the "Move Apps" item will be grayed out. There is no "move apps to internal storage" option.

But you can still move apps back to your internal storage manually by following these steps:
- Open the Settings->Storage menu.
- Tap the "SD Card" icon.
- On the following screen, tap "Apps & Games."
- You'll be greeted with a list of all apps.
- Find the app you want to move and tap on its name.
- If, on the following screen you see something like "120MB used in external storage," then this app is installed to your SD card.
- Tap the Storage option to bring up storage details for that app.
- Tap the "Change" button to choose whether the app should be installed on internal or external storage.
- If you choose "internal" then you'll be greeted by a screen asking if you want to move that app.
- Choose "Move" to complete the transfer.


It's kind of a tedious process, because not all of the apps listed in the "Apps & Games" menu are installed on your SD card. So you may have to hunt to find all the ones that were moved by Fire OS automatically.
If, in step six, you see something along the lines of "120MB used in internal storage," then your app is already running from built-in storage and you should hit the back button and search for other apps to transfer.
Note that if you decide to reformat your SD card for use as portable storage and you already have apps installed on that card, they will be uninstalled and their data will be deleted if you haven't transferred them to internal storage manually first.

The good news is that Fire OS will give you a warning message before allowing you to reformat the card so you can make an informed decision.
And that covers the basics of using an SD card with Fire tablet in mid-2020. But what about older models running earlier versions of Fire OS?
Using SD cards with an Amazon Fire tablet running Fire OS 7.3
Everything described in this section has been tested on an Amazon Fire HD 8 (2017) tablet running Fire OS 5.4 and was originally published on July,14, 2017. The steps should be similar on other Amazon tablets running Fire OS X.

Getting started
Open the door covering the SD card slot, insert a card that's formatted using the FAT32 or exFAT file system, and you're good to go.
If you've already loaded music or videos onto the card, you should be able to find them by going to the Music or Video tabs in the home screen launcher… although it may take a little work to find them.

For example, in the Music tab you'll need to tap "My Music," then tap the Settings icon, and then toggle the option that says "Offline Music Mode" so that you only see music that's on your device and not music in the cloud that you've added to your Amazon Prime library.

If you've already downloaded some music to your device, there's also an option in the Music Settings labeled "transfer all offline music." You can press this to copy music from internal storage to the SD card.
![]()
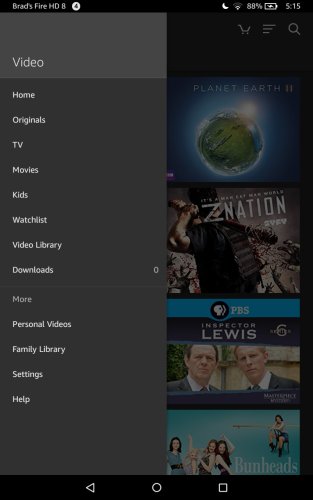
For videos, open the Video tab, select Library, open Settings, and then choose "Personal Videos."
Or you can just use a third-party file explorer like File Commander or Total Commander, navigate to the files you want to open, and then select the app you want to use. Personally, I'm using Solid Explorer, which isn't available from the Amazon Appstore, but which you can download from the Google Play Store (if you've installed that), or from a third-party source like APKMirror.
You can either load music, movies, and other content onto your SD card by ejecting the card, inserting it into a card reader on your computer and copying files, or by plugging your tablet into a computer with a USB cable so that it shows up as a storage device. That second option is probably safer if you're using a tablet that's already had a card inserted, since it reduced the risk of data loss or corruption. But see below for instructions on safely ejecting the SD card.
Choose which items should be downloaded to the SD card
Once your SD card is inserted, Fire OS will automatically save certain types of content you download in the future to the card. But you can choose which items are and are not saved.
Open the Fire OS settings menu, choose the Storage option, and then scroll down until you see the SD card section.

There are a list of toggles. You can enable or disable options including:
- Download Movies and TV Shows to Your SD Card
- Download Music to Your SD Card
- Store Photos and Personal Videos on your SD card
- Download Audiobooks to your SD card
- Download Books and Periodicals to your SD card
Most of these options have to do with content downloaded from Amazon. The photos and personal videos option refers to content you shoot with your tablet's cameras.
Install (or move installed) apps to the SD card
There's one other toggle labeled "Install Supported Apps on your SD card." Once enabled, any apps that you attempt to install in the future that can be loaded onto the SD card will be.
There's also a "Move Apps to SD Card" option that will move any pre-installed apps that are compatible with running from an SD card. Note that it can take a long time for that process to complete, so be patient.
![]()
While moving apps to your SD card is a one-click, long-wait process, I noticed there's no quick and easy way to move all apps from your SD card back to built-in storage. But you can do it one-by-one.
Just tap the "SD Card Storage" option in your Storage settings, choose "Apps & Games" on the following screen, and then you'll see a list of SD Card Compatible apps that are installed on the card. Tap any of those apps to bring up a detail screen that includes an option to "Move to Tablet."
Keep in mind that while this will free up space on your device, you could run into a few issues:
- If you remove the SD card for any reason, you won't be able to run apps that are installed on the card.
- You might not save as much data as you expect, since some portions of some apps will remain on the tablet's internal storage.
- Read and write speeds for most SD cards probably aren't as fast as for the tablet's built-in storage, so depending on your card, your tablet may perform some tasks more slowly.
- If your SD card fails, it will take your apps with it.
Remove or Erase your card
Want to eject your card? Then you'll probably want to make sure it's not in use first.
Go to the Storage settings, scroll down to the bottom of the page, and you'll see an option marked "Safely Remove SD Card." This will stop any tasks associated with the card to prevent problems.

Or if you want to erase everything on the card, there's an option for doing that too.
Fortunately there's a warning message the pops up before you take either action, so it takes at least two clicks to erase or eject the SD card, making it less likely that you'll do either by accident.

You also won't be able to erase or eject the SD card if your tablet is connected to a computer via a USB cable. You'll need to unplug the tablet before making those sorts of changes to the card.
Looking for more things to do with your Amazon Fire tablet? Here are some more resources from Liliputing:
- How to install Google Play on the Amazon Fire HD 8 (2020)
- Amazon Fire HD 8 (2020): How to disable Amazon apps and features
- Amazon Fire tablet hacking resources (Fall 2019 edition)
This article was originally published July 14, 2017 and last updated July 11, 2020.
Liliputing's primary sources of revenue are advertising and affiliate links (if you click the "Shop" button at the top of the page and buy something on Amazon, for example, we'll get a small commission).
But there are several ways you can support the site directly even if you're using an ad blocker* and hate online shopping.
Contribute to our Patreon campaign
or...
Contribute via PayPal
* If you are using an ad blocker like uBlock Origin and seeing a pop-up message at the bottom of the screen, we have a guide that may help you disable it.
How to Clear Memory on Kindle Fire 5th Generation Tablet
Source: https://liliputing.com/2020/07/use-sd-card-amazons-fire-tablets.html